Welcome!

Do you have APA formatting questions? Thesis statements got you down? Need to study grammar? Need some help with critical thinking? Having trouble with literary analysis or research? Want to take a look at some example essays? Well, I probably have a post here somewhere that can help you. Please use "Search This Blog," the "Labels," or my "Blog Archive" to help you find what you need. Have questions about what you find? Please feel free to comment or ask questions. I do moderate comments, and I try to respond to all topical questions and comments in a timely manner.

Wednesday, March 6, 2013

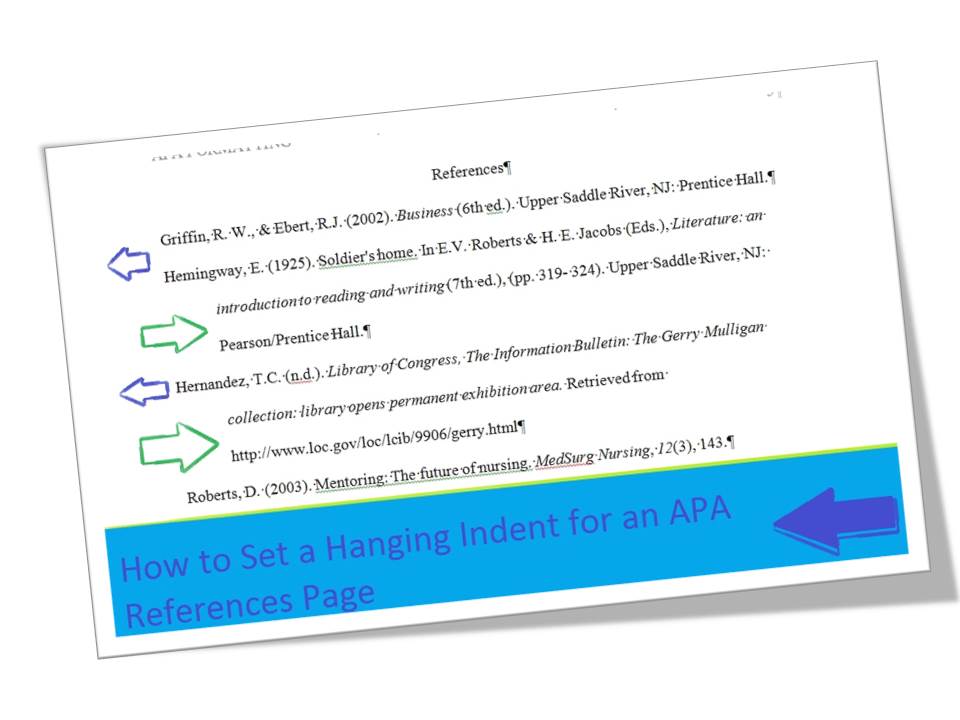
How to Set a Hanging Indent for APA or MLA Formatting


Setting a hanging indent in Microsoft Word doesn't have to be a challenge.
Let all of your source authors "hang out."

What is a Hanging Indent? 


A hanging indent is what most students might think of as a reverse indent. It's when the top line of a paragraph, or in this case a reference entry, is aligned left, while the rest of the lines in the paragraph or entry are indented.


Why Do I Need to Set a Hanging Indent?


The Publication Manual of the American Psychological Association states that a list of references should begin on a new page of your paper with the word "References" centered at the top of the page.  They stipulate that reference entries should be double-spaced, and the "APA publishes references in a hanging indent format, meaning that the first line of each reference is set flush left and subsequent lines are indented" (2010, pg. 37).

The hanging indent on an APA references page serves a very important purpose. This formatting allows a reader to cross-reference in-text citations with the complete bibliographic information included on a references page. If you have in-text citations for authors by the last names of Hubbard, Pickens, and Airdale, you'll most likely, unless you interviewed your sources, have complete bibliographic information for those three authors listed on your references page in alphabetical order. The last name of the author in your in-text citation matches the last name on the first line of your entry, making it easy for a reader to find.

For example, you might have an in-text citation that looks like the following:
According to an article published in The Formatting Magazine on June 8, 2012, "APA formatting is a fascinating topic" (Pickens, pg. 4).

The reference entry for that quotation would then appear on the references page in proper APA fashion with a hanging indent. The first word in the entry would be "Pickens." Without a hanging indent, however, the reader would have a hard time picking "Pickens" from the other entries, especially if there were ten, twenty, or thirty entries. Without a hanging indent, the reader simply sees a dense block of text:

Airdale, G. (2012). WOO! APA. Boston, MA: Fake Publishing Company.
Hubbard, N. F. (2009). A response to Airdale's claim that APA is something to woot about. Online APA Forum Journal. Retrieved from http://www.onlineforum_responsestoairdale
Pickens, G. L. (2012). Say yes to APA formatting. The Formatting Magazine 2(3) p. 4-5. Retrieved from http://www.theformattingmagazine_APApickens


How Do I Set a Proper APA Hanging Indent Using Microsoft Word?


There are many ways to set a hanging indent. However, knowing how to set a hanging indent without any auto-formatting really is the easiest way to go about it.  These are the instructions for setting a handing indent using Microsoft Office Word 2010.

  1. First, be sure the cursor is at the top of a new page immediately following the conclusion of the paper. It's best to insert a page break after the last word of the conclusion.
  2. Check to be sure your margins for the document are set to 1 inch on all four sides of the page.
  3. Be sure your "Paragraph" settings for "Before" and "After" spacing are both at 0 and the line spacing is at "Double" for your entire document.
  4. Make sure all of your text is set for Times New Roman 12 point font.
  5. Last, but not least, make sure you have not inadvertently deleted your running head.
  6. Use the "Home" tab "Paragraph" settings to center the first line of the new page and type the word "References." Do not underline, italicize, or set the font to bold.
  7. Type "Enter" to move to the second line of the page.
  8. From the "Home" tab "Paragraph" menu, reset the second line page alignment to left align.
  9. Using your APA Publication Manual or abbreviated APA citation guide, create all of your reference entries without concern for the hanging indent. Simply press "Enter" between entries.
  10. If you have not typed your entries in alphabetical order, highlight them using your mouse and drag them into alphabetical order.
  11. When you've finished typing all of your entries and they are in alphabetical order, from the "View" tab, choose to show the ruler.
  12. Use the mouse to highlight all of your reference entries, but just the entries.
  13. Without clicking anywhere else on the page, use the left ruler sliders to set the hanging indent. It's comprised of three shapes: a top triangle pointed down, a bottom triangle pointed up, and a square. Click and drag the bottom square to the 1.5 inch mark (to the right of the current margin). Release the mouse. Be sure your reference entries are still selected. Click and drag the downward-facing top triangle back to the 1 inch margin (back to the left).
  14. All of your reference entries should now have a hanging indent!


Tuesday, March 5, 2013

"New" Ways to Think About Paragraphs

A sheep in a fence.  Chickens in a fence.  A pig in a fence.
This essay about a farm has body paragraphs about sheep, chickens, and pigs.

“How long is a paragraph?” I ask my new groups of college writers every new term. 


“Three to five sentences long,” they respond. I spend the next eight weeks of class persistently and vehemently attempting to eradicate that response from their conscious and subconscious minds. This “three-to-five-sentence thinking” can lead to many problems, from a student’s inability to read and comprehend study materials to a basic lack of understanding about how to write effectively.

In order to better prepare middle and high school students for college or professional writing, they need to be taught to think about paragraphs with much more complexity.

What Is a Paragraph? A Paragraph is the Unit of Reason

In a world where students are tested in English via a standardized multiple-choice exam, lessons in English have had to become mere sound-bites, or easy-to-remember and oversimplified ways of thinking, which leads to classes of graduates beginning college or entering the work force with inadequate skill sets. When students think about paragraphs as a set number of sentences, what they’re missing is the idea that the paragraph is a unit of reason, just as the sentence is the basic unit of thought. They can neither identify the topic sentence in what they read, nor can they incorporate topic sentences into their own writing. Even worse, students sometimes have difficulty distinguishing thesis statements from topic sentences.

What Does a Paragraph Do? A Paragraph is a Fence that Holds Ideas Together

The comparison of a paragraph to a fence stems from a piece of creative nonfiction written by Sherman Alexie, entitled “Superman and Me.” In “Superman and Me,” Alexie explains how he learned to read and the importance of reading in his life. In recounting the moment when he recognizes the paragraph for the first time, he writes, “I realized that a paragraph was a fence that held words. The words inside a paragraph worked together for a common purpose. They had some specific reason for being inside the same fence.” He goes on to describe how thinking about “everything in terms of paragraphs” then changed the way he thought about writing essays and learning to read.

For students who think metaphorically, often visual learners or students who self-identify as people who “think in pictures,” thinking about a paragraph as a fence (or any other appropriate comparison) can help them overcome the three-to-five-sentence mentality. Instead of focusing on completing a set number of sentences, students who think about paragraphs as fences think about their ideas, and how ideas can either be inside or outside of any given “fence.” After students begin thinking about their own ideas and the organization of those ideas, their writing can flourish.

How Long Is a Paragraph? A Paragraph is as Long as Necessary to Support a Topic Sentence with Unity, Coherence, and Clarity

For students who learn by first memorizing rules or definitions, a more thorough definition might serve to replace a simplistic response. Just as the comparison of a paragraph to a fence helps students who “think in pictures” understand that it’s their ideas that are important, so too can a more thorough definition help students who “think in words” focus their writing.

For example, the key words in the response, “ A paragraph is as long as necessary to support a topic sentence with unity, coherence, and clarity” can be used to remind a student, almost like a checklist, how to compose effective paragraphs that truly communicate ideas to a reader.
  • A paragraph must contain a clear topic sentence about one main idea related to the thesis. 
  • A paragraph must offer support or evidence to prove the main idea stated in the topic sentence. 
  • A paragraph should support only the one main idea stated in the topic sentence. 
  • A paragraph should be well-ordered, and the writing should flow from one piece of evidence to another. 
  • A paragraph should be proofread for clarity.
Whatever the statement a teacher composes about how students should think about paragraphs, it should not be merely prescriptive, but truly define the paragraph as a complex set of ideas working together to support a claim.

To return to the example stated in the caption to the image of the farm, one main idea is about sheep, one about chicks, and one about pigs. Those main ideas must be stated as complete thoughts, with claims, in order to become topic sentences. Each of those must be held together by a thesis. 

Thesis: A one acre farm can support sheep, chickens, and pigs, as long as the farmer understands basic animal husbandry.
  • Topic sentence one: A one acre farm can support sheep given the following basics of sheep husbandry.
  • Topic sentence two: Additionally, a one acre farm can support a number of chickens as long as the farmer keeps the several rules in mind.
  • Topic sentence three: Lastly, with minimal specialized knowledge and understanding, a farmer can support a two to three pigs on a one acre farm.
Perhaps over time, my students will less and less often respond to “What’s a paragraph?” with “Three to five sentences.” In the meantime, however, I will continue to combat their misunderstanding with a few “new” ways to think about paragraphs.

Want to learn more about writing essays?  Read


References
  • Alexie, S. (1997). Superman and Me. In Schakel, P. & Ridl, J. (Eds.). Approaching Literature: Writing + Reading + Thinking (2nd ed.), (pp. 4 - 6). Boston, MA: Bedford/St. Martin's.

Copyright Amy Lynn Hess. Please contact the author for permission to republish.

The Difference Between Persuasion and Argumentation

Carter Motors, Inc., Volkswagen, Seattle WA, 1973 by Alden Jewell

Helping students learn to use reason and logic when writing requires that they understand the difference between persuasion and argumentation.

When I ask students to write argumentative essays in their beginning composition courses, we begin with a brief lesson on the difference between persuasion and argumentation. Since I have been explaining this difference, student papers have improved tremendously. The papers sound less like infomercials and more like reasoned arguments in favor of a position. The former is persuasion, and the latter is argumentation.

Writing an Essay in the Persuasive Mode


The difficulty in asking students to write a persuasive essay is that the purpose of persuasion is to convince or persuade another person to do or believe something by any means necessary. Barnet and Bedau explain, in From Critical Thinking to Argument, that “To persuade is to win over – whether by giving reasons (that is, by argument), by appealing to the emotions, or, for that matter, by using torture” (2011, pg. 51). As instructors, we certainly don’t want students to write essays with any sort of faulty reasoning, be it emotional or another error in relevance, an ambiguity error, or an unwarranted assumption. Even more so, we do not want students contemplating the use of torture as an appropriate alternative to writing a paper.

Writing an Argumentative Essay


Just as students must be able to narrow a topic in order to more effectively write about that topic, we must ask that students narrow down their purpose for writing in the persuasive mode by asking that they write using argumentation versus torture or emotional appeal, otherwise known as pathos.

When we ask students to write argumentative essays, we are asking them to use logic and reason, or the quality of logos, to support a claim by offering sound and valid reasons. By giving well-researched and unbiased information in an essay, students are demonstrating they are well-meaning and trustworthy writers. The demonstration of that quality, also known as ethos, proves to readers that the writer has a just position and can be believed.

A hypothetical example I use to help students understand the difference between these two terms is an example about buying a car. Students can usually relate to the example, which includes a demonstration of all three types of persuasive techniques: the use of reason, emotion, and even a little torture.

An Anecdote: The Difference between Persuasion and Argumentation


"Pretend you’re in the market for a new car," I tell the students. "When we finish the example, we'll talk about the differences between what the salespeople at the dealerships do, and what you will need to do." Then, I begin my example:

You decide to look at a Ford dealership and at a Volkswagen dealership to compare a few different cars you’ve liked for a long time.

When you go to the Ford dealership, the salesman tells you all about the new Ford Mustang. Using his persuasive skills and a bit of emotional appeal and a few relevancy errors, he tells you how safe it is, what great gas mileage it has, how reliable it is, and how popular it is with people who are exactly like you. He tells you how great you’ll look behind the wheel of this American classic. He makes you sit in an office for 6 – 8 hours while he and his manager “negotiate” the price of the car. This salesman has used persuasion, not argumentation, to try to sell you the Mustang.

Then you go and look at Beetles at the Volkswagen dealership. When you get to the Volkswagen dealership, the salesman tells you all about the new Beetle. Using his persuasive skills, including a little emotional appeal and a few relevancy errors, he tells you how safe it is, what great gas mileage it has, how reliable it is, and how popular it is with people who are exactly like you. He tells you how great you’ll look behind the wheel of this reliable classic. He makes you sit in an office for 6 – 8 hours while he and his manager “negotiate” a sales price. This salesman has used persuasion, not argumentation, to try to sell you the Beetle.

After you visit both dealerships, you go home to put your critical thinking skills to the test and consider your options. You do additional research on both cars to check the facts given to you by the dealers, make pro and con lists for both vehicles, rate your priorities, and make a sound decision about which car to buy. Once you complete your research, you choose to buy the Volkswagen Beetle.

The day after your purchase, you drive your new car to work where you’re greeted by a co-worker who says, “That’s not even an American car! Why’d you decide to buy that car?” Now you’re in a pickle. You have to defend your position to your co-worker while refuting his assumption that an American car was the best choice for you. In other words, responding to your co-worker will require skills in argumentation.

All of the test drives, questions to the salesperson, and time spent investigating options was research. Coming to a conclusion about which car to purchase was the culmination of that research.  That research can now be used to create an argument that will address the issue presented by your co-worker.

Want to read more about critical thinking and argumentation?  


Want to learn more about writing essays?  


Want to write better paragraphs and essays?  Try my online course!Try my complete online essay writing course on Udemy Writing for English Composition: College Essays.


References

  • Barnet, S. & Bedau, H. (2011). From critical thinking to argument: A portable guide. (3rd ed.). Boston, MA: Bedford St. Martin’s.


Copyright Amy Lynn Hess.  Contact the author for permission to republish.

Research and Writing Basics: Evaluating Source Content

Source content should be Reliable and Relevant, Authoritative and Timely


When including source content in your essays, you want to use such great sources of information you can brag about them.  

You want your readers to be blown away by the quality of your included experts.   You want your classmates to exclaim, “Wow!” and your professors to shout “A+ + + + +” when they read your paper and look at your exceptionally impressive list of sources.

However, there is so much information on the Internet, and so many misinformed experts, how can you tell the real deal from the duds?

First and foremost, don’t be a frightened little mouse when it comes to adding source evidence to your essays.  Be a big RAT:  Keep in mind the principles of reliability, relevance, authority, and timeliness, and you’ll be able to evaluate and incorporate source content with confidence.


R is for Reliability and Relevance


Before adding any content to your essays, remember the “R” in RAT.  It stands for both reliability and relevance.  

Reliability is the level of probability or certainty of truth. Some ways to check for the probability of truth is the check the expertise and credentials of the author or authors by googling them. You can also check to see if other authors generally agree or disagree with the source author or the source author's main ideas. For example, in the sciences, you can ask if another researcher or author has been able to duplicate the results of an experiment. If so, the results are probably more reliable than if others had had different results.

Another way to say relevance is “applicability.”  Ask yourself if the information in the source is applicable to the specific argument or claim you make in your thesis and topic sentences.  Are the writer’s arguments and examples pertinent to your topic?  Can you use the writer’s ideas to back up your own ideas?  Can you use the writer’s ideas as a starting point from which to argue an opposing view?  If so, skim the source.  Carefully read the writer’s arguments or claims, and look for the main idea of each paragraph. Carefully read for key words.  If your source is relevant to your paper, read it through carefully and take notes.  If it is not, move on to another source.

A is for Authority


We’ve all seen some sort of courtroom television, and we’ve all noticed that before a lawyer calls an expert witness to the stand, they brag about them a little.   “I call my next witness, Mr. Brown, who has been the forensics expert in our state for thirty years and has won numerous awards for his scientific achievements in the study of forensic,” they might say.  You never hear them say, “I call my next witness, Vivien, who once wrote a blog post about her interest in forensics.”  That would probably get the lawyer kicked out of court.  The same principle applies to your papers.  If your source isn't a source you feel comfortable bragging about in the context of your paper, you should use the source.

The “A” in RAT stands for authority, and it is your responsibility to check up on your source writer’s authority.  Google the source writer’s name, and look to see if he or she has written other articles on the same topic.  Check your library’s subscription databases to look for records of peer-reviewed articles by the same author.  Check to see if the writer is published in trustworthy publications or questionable publications.   Check to see if the writer is quoted by others.  After checking up on the author, decide if you can brag about your source writer.  If you can, read the source carefully and take notes.  If you cannot, move on to another source.

T is for Timeliness


For some topics, the timeliness or publication date of an article is just as important as its content.  For example, if your essay is a discussion of current trends in hairstyling, you wouldn’t want to use a source from 1960 to back up your argument that one of today’s most popular hairstyles is the beehive.  Unless you were writing in an obviously satirical manner, that would be an irresponsible use of information.  Additionally, if you were writing about the features of the newest smartphone, you couldn't possibly use a source more than a few months old, because even after a few months, your information would be out of date!  Therefore, when evaluating source content, make sure you remember the “T” in RAT, which is timeliness.  If your source is timely, read it carefully and take notes.  If it is not, move on to another source.

Remember RAT


Each and every time you begin to look for source content for your essays, be sure you are remembering RAT as a way to help you evaluate your content before you choose to use it in an essay.  Check each of your sources for reliability, relevance, authority, and timeliness.


Want to read more about critical thinking and writing skills?  Try

Assessing Critical Thinking
Annotated Bibliography Assignment Guide for Students
Identifying the Rhetorical Situation and Rhetorical Appeals


Want to learn more about writing essays?   

Try my complete online essay writing course on Udemy Writing for English Composition: College Essays.


Copyright Amy Lynn Hess. Please contact the author for permission to republish.


Why Do I Have to Prewrite?

A painting of a man catching vague dreams.
The Wisheater by Amy Lynn Hess

Prewriting is a method writers can use to dig down deep into their brains and pull out the best and most interesting ideas and opinions about a topic before they start writing about that topic.  


Thinking through all of the potential topic questions and categorical breakdowns of a broad topic gives a writer time to discover and focus on an interesting angle or a unique approach to an essay about that topic.  When prewriting, writers takes the time to think about their audiences, their purposes, and their own interests.

Divergent Thinking


The type of thinking a writer does during the beginning prewriting stage is different from the type of thinking called for in later stages of the writing process.  Prewriting calls first for divergent thinking, a process defined by the online Merriam-Webster dictionary as “creative thinking that may follow many lines of thought and tends to generate new and original solutions to problems” (n.d.).  Writers should feel unfettered, not be hampered by following conventional lines of thought, and they should playfully consider the topic from all avenues aligned with their own interests and understanding before choosing their narrowed topic.

Most student writers can relate this to clustering, mind mapping, freewriting, brainstorming, and looping.  When writers give these types of prewriting techniques their full and undivided energies, they find they can tap into previously unrealized and exciting ideas about any topic.

Critical Thinking


Once a writer exhausts all ideas about a topic, and then writes a little more beyond that exhaustion, he or she is ready to begin choosing the best ideas from the prewritten materials.  Once the writer stops generating ideas and begins choosing the best ideas, that writer changes gears: first gear, divergent thinking to second gear, critical thinking.  Critical thinking is “that mode of thinking - about any subject, content, or problem - in which the thinker improves the quality of his or her thinking by skillfully taking charge of the structures inherent in thinking and imposing intellectual standards upon them” (The Foundation for Critical Thinking, 2011).

The processes most related to this are the narrowing down of a broad topic to fit the scope of an assignment, the composition of a thesis and topic sentences, outlining, and generating or finding the best evidence to support topic sentences.  It’s at this point a writer has to stop and consider how a line of thought might develop, what might convince an audience, or what sort of insight they can offer a reader.

Not Just Because I Said So


When I tell students they have to prove to me they have completed the prewriting stage of the writing process for any given essay, they groan and fuss because they think I am asking for “extra” work.  However, when a writer takes the time to prewrite, really takes the time and writes well, it pays off in the end.

Writers who let the floodgates open and jot down a plethora of ideas about a topic without stopping to edit or censor any of those ideas are writers who give themselves more options for the choosing when it comes time to be choosy.  Plain and simple, writers who prewrite write better and more interesting essays than writers who do not.

Want to read more about the writing process and prewriting? Try

An Overview of the Writing Process
What's a Rhetorical Situation?
Prewriting the Research Essay: Starting with "I Think"


Would you like content about writing for college composition courses delivered in video format?

 Try my online Udemy course called Writing for English Composition: College Essays.


References

  • Divergent thinking. (n.d.). Merriam-Webster. Retrieved from http://www.merriam-webster.com/medical/divergent%20thinking
  • The Foundation for Critical Thinking. (2011). Defining critical thinking. The critical thinking community. Retrieved from http://www.criticalthinking.org/pages/defining-critical-thinking/766

Copyright Amy Lynn Hess. Please contact the author for permission to republish.

Monday, March 4, 2013

Types of Evidence: Writing Well-Supported Paragraphs

This is a photo of a doe and her fawn.  A little bit of evidence would help shed some light on the subject.
 

Use the "Best" Evidence to Establish Clarity

One of the first rules of writing a well-supported paragraph is to support the specific claim of the topic sentence, not merely repeat the claim.  This means the writer should write with clarity,  using enough evidence in each paragraph to satisfy the curiosity of his or her audience.  In this, there are two implications.  First, the writer has to understand the needs, attitudes, and knowledge-level of that specific audience and adapt the evidence accordingly.  Additionally, the writer has to know how and when to use different types of evidence based on the complete rhetorical situation. The writer should strive to use the "best" evidence available to meet the needs of that audience and that situation.

Using Narrative Evidence to Support a Topic Sentence


To use narrative is to tell a story, usually in chronological (time) order.  Sometimes, an entire essay can be based on one extended story.  When a writer uses a narrative for an entire essay, we call it a “narrative essay.”  However, shorter bits of narrative can also be used to support individual topic sentences.

Writers use narrative when they are conveying ideas that are not easily explained in concrete or logical terms.  For example, in order to explain “love,” a writer might use a narrative, or multiple narratives, about a time or times when he or she loved a person, place, thing, or idea.  It’s nearly impossible to define “love,” but telling a story about it can help readers understand the writer’s idea and come to a shared conclusion through the act of storytelling.

Using Description to Support Topic Sentences


A writer uses description to give visceral, sensory details about the topic.  Sensory details are statements that explain the topic using the five senses.  Sometimes writers write an entire essay in the descriptive mode.

An essay about how to bake a cake could make excellent use of description to answer potential questions the readers might have about the cake.  A reader might want to know the texture and taste of the cake before they try to bake it, or they might need to know how to tell if the cake is done baking.  Description is also useful in objective reporting, such as when police officers must carefully explain everything they saw, heard, or maybe even smelled when they approached a crime scene.

Testimony Adds Authority and Witness to Paragraphs


Testimony is something someone else has written or said.  That person might be an expert who lends authority and credibility to the writer’s position, or it might be a lay person who can act like a “witness” in support of the writer’s claim.

Writers can use testimony, as stated above, to add authority, to provide “witness,” or to borrow words from another person who has said something more eloquently than the writer has been able to say it (Osborn, Osborn, & Osborn, 2009).  For example, to add authority to this statement, I have paraphrased and cited a textbook passage written by well-known experts in communication and public speaking.

Examples as Evidence Make Ideas Real


Examples can be either hypothetical or real.  For example, if I were to explain grocery store product placement techniques, I could write about the grocery store I most frequent and how their most expensive non-food items, flowers and gifts, are placed to the right of the entrance for highest visibility by shoppers.  I could also, on the other hand, explain that a grocery store might, for highest visibility, place their highest priced non-food items to the right of the entrance; perhaps wines or imported cheeses.  Instead of being specific in the second example, I have been general and hypothetical.

Whether real or hypothetical, examples help make the writer’s ideas concrete for the reader.  Examples help readers picture the writer’s ideas or place an idea in a real or realistic context.

Reason and Logic Makes your Argument Clear


To use reason to support the claim of a topic sentence is to use analogy and inference.  Additionally, a writer could use one of the two frameworks for logical reasoning, which are inductive reasoning or deductive reasoning.  

Inductive reasoning happens when a writer examines information and makes observations about the topic, and then makes a statement of probability based on that information and those observations.  Scientific papers, studies, and experiments call for writing using inductive reasoning, wherein the writer fully explains his or her reasons for coming to a particular, probable, conclusion.  This type of personal observation and conclusion structure also works in essays.  Look at this example of inductive reasoning: If a student has been late to class every Monday for eight weeks, it is reasonable for that professor to expect the student to be late on Monday in the ninth week.

Deductive reasoning relies mostly on the syllogism, a set of patterns of logic writers can use to help answer questions with certainty.   One way to use deduction in writing is to use the enthymeme instead of the thesis statement to open the discussion of the topic: That means the writer uses a thesis that creates a clear connection between the claim and the reasons.  The reasons are easy to find in sentences that use the word “because,” such as in the statement, “Teachers should not be armed in the classroom because it would have a negative psychological effect on the students.”  The reason will follow the word “because.”  This is an especially effective technique when writing in the argumentative mode or preparing a debate.  After such a statement, the writer’s main job becomes supporting that statement.

Facts and Statistics Establish Credibility


A fact is a piece of information that is verifiable, such as a dictionary definition or information given in reports or other reference sources.  As a matter of fact, it is a fact that the faces on Mount Rushmore are George Washington, Thomas Jefferson, Theodore Roosevelt and Abraham Lincoln.  Statistics are numerical figures that scientists or researchers have collected and interpreted.  The following sentence contains two statistics: According to the United States Geological Survey, “about 70 percent of the Earth's surface is water-covered, and the oceans hold about 96.5 percent of all Earth's water” (2013, para. 1).

Facts and statistics help a writer establish credibility for the idea or position stated in the topic sentence.  According to Osborn, Osborn, and Osborn (2009, pg. 170), “Facts and statistics are especially important when your topic is unfamiliar or your ideas are controversial.”  Verifiable facts and statistics provided by expert sources can help persuade a reluctant audience or help inform an audience about a new idea.

Use a Variety of Types of Evidence 

No matter the type or topic of an essay, the writer must add evidence to the paragraphs to support the topic sentences.  Having an arsenal of types of evidence at the ready will allow a writer to write wonderfully clear and engaging prose.


Want to learn more about writing essays? Try

An Overview of the Writing Process 
Outlining an Essay
Introduction Paragraphs and Lead-Ins

References


  • Osborn, M., Osborn, S, & Osborn, R. (2009).  Public Speaking (8th ed.). Boston, MA: Pearson Allyn & Bacon.
  • United States Geological Survey. (2013). The USGS water science school. Retrieved from http://ga.water.usgs.gov/edu/earthhowmuch.html

Copyright Amy Lynn Hess. Please contact the author for permission to republish.

Sunday, March 3, 2013

Product Review: Escoda MARFIL Series Brushes for Acrylic Painters


Escoda MARFIL Series Brushes

A Note from Mr. Escoda

I recently received by post a package addressed to me from Sabadell, Spain, the home of the Escoda brush company. In the package, I was excited to find a set of three new synthetic brushes for acrylic painting, one natural hair cosmetic brush, an Escoda catalogue, and a friendly note from Ricard Escoda. Mr. Escoda, in his note, warned that this new series of brushes for acrylics might be "quite stiff," but that he was happy to allow me to test the product as I requested.

For my tests, I compared these brushes to Escoda's own 2511 brush, Princeton's 6000 and 6200 series, and M. Grumbacher's 4720. Based on the look and feel of these brushes, their durability and the quality of their stroke and line, I would recommend the Escoda MARFIL series brushes for both beginners and experienced painters.

Look and Feel of the Escoda Brushes


My first test for these new MARFIL brushes was to compare their "first look" marketability to the brushes I already have. As an artist, I understand that shopping for art supplies is enjoyable, and just examining various art supply options can be inspiring. In the store, I pick up supplies that capture my interest.

When these brushes were placed next to brushes I purchased in the past, I noticed these brushes stand out. They have much brighter handles, both in color and finish, than brushes I already have. Because of their glossy red finish, I would definitely be interested and pick them up for a closer look. The handle felt better in my hand than some of the others because of its smoother surface and shorter distance from flare to brush tip. However, I also noticed that the synthetic bristles do look less glossy and are stiffer than the bristles on brushes I already own, as Mr. Escoda warned. They are certainly not as coarse as boar bristle brushes, but they have a very tight snap, which might discourage some acrylic painters.

All in all, based on the look and feel of these brushes, I would certainly want to handle them in the store, and would likely purchase one or two to test at home.

Testing the Durability of the Artist Brushes


A casual glance was enough to tell me right away that the quality of the crimp for these brushes truly sets them apart from anything else I currently own. As stated in the Escoda catalogue, This is a "design exclusive to Escoda." The importance in the ferrule's crimp is the brush's durability. As they go on to say, "The triple crimping ensures that the ferrule and the handle are perfectly interlocked" (pg. 4). This prevents, in other words, the metal part of the brush from coming off the handle of the brush. As an artist, I can attest that this does happen, especially if a painter leaves brushes soaking in water for any length of time, tugs too harshly on the bristles, or cleans his or her brushes in water that's too warm, which loosens the glue holding poorly crimped ferrules in place.

Additional durability testing included bending the brushes to see if they would break at the ferrule or end of the handle and a few tugs on the bristles to see if they would go awry or come loose. Bending the brushes, both the new brushes and my comparison brushes, made me nervous, but all of the brushes held up to equal amounts of pressure. The tug test results supported the quality of the crimp even further: The bristles on the Escoda brushes did not budge upon tugging, but the ferrule of my M. Grumbacher brush came off the handle.

Based on the quality and durability of these brushes, I would recommend them to beginners and professional painters, alike.

Quality of Stroke and Line


My concern about the stiffness of the bristles could not be addressed until the brushes were put to use. Because the Escoda brushes survived my quality and durability testing, I was able to test their use in an actual painting.

  • First, I tested the Escoda #10 filbert, a style of brush I like to use for blending long strokes. On watercolor paper, the stiffness of the brush lifted too much paint from the surface and did not create an even, blended color. However, on a well-stretched canvas and on a canvas board, the brush performed quite well, and one color blended nicely into the next.

  • Next, I tested the #10 bright, a brush I would use to make hard, even lines. I generally want a stiff brush for this purpose, and it worked well on paper, stretched canvas, and canvas board. Its tight snap allowed it to respond to my pressure without losing the line.

  • Because I do not normally reach for a round brush, I tested the #10 round last. I was pleasantly surprised by this brush because its length softened its snap well beyond the snap of the other two brushes. I played with this brush as a calligrapher might, shifting from wide to narrow lines and strokes easily. Although it was not achieved on paper, I was able to achieve shadow and highlight without lifting the brush from the stretched canvas, but rather rolling the brush as I formed the shape.

Based on the easy-to-achieve shifts in strokes, sharp lines, and use for blending, I would recommend these brushes for painters who paint on stretched canvas or canvas board.

With the exception of my durability tests, I truly enjoyed working with these brushes to provide feedback for artists and art supply stores, alike. They are beautiful brushes that could inspire any painter. More importantly, they are a testament to almost 80 years of Escoda's hand-made excellence.

References


Escoda Sabates, S.A. (n.d.) Catalogue. Retrieved from http://www.escoda.com/?lang=en


Copyright Amy Lynn Hess.  Please contact the author fr permission to republish.

Golden Gel Mediums and Pastes Offer Exciting Acrylic Textures

Four Women on a Bench by Amy Lynn Hess, Golden Artist Color acrylic paint and gels on canvas


I haven't often used gel mediums and pastes in my own paintings.  To me, they always seemed to be a sticky mess.  However, I recently wrote to Golden Artist Colors, an employee-owned company based in New York, to request a sample of paint for testing. In addition to shipping a set of paints for me to test, Golden also sent a set of six gel mediums and pastes. In addition to testing their paints, I was more than happy to test something I have not had a lot of experience using.


Using Golden's Acrylic Gel Mediums and Pastes


All in all, I enjoyed testing Golden's Gel Mediums and Pastes, which gave me more of a feeling of control than when I have tried using other gel mediums and pastes in the past. I tested these materials while completing a small painting I've been planning for a few weeks.

As stated on the Golden Artist Colors Web site, a gel medium is like a "colorless paint" used to "build texture." The most inspiring thing about using these types of gels and pastes is that as long as they are used safely, there is no wrong way to use them. The literature I received with the set reiterates these ideas and offers intriguing photographs and examples of their uses.

Of the set of six, I chose to use the Coarse Pumice Gel, the Light Molding Paste, and the Clear Tar Gel.

Coarse Pumice Gel


I used the Coarse Pumice Gel to add a layer of sandy, gritty texture. I mixed the paint, then added about an ounce and a half dollop to the paint. I spread the gel over the canvas using a palate knife, then worked additional paint right into the wet pumice gel. I finished this layer by going back over the area with the palate knife. The visual effect reminded me of dot stipple, which I very much like, and it wasn't difficult to achieve. On the negative side, the sound of the pumice gel being spread across the canvas was not very pleasing, and I made more of a mess than I would ever normally make as small gobs of pumice fell off of the palate knife and painting.

Light Molding Paste


I used the Light Molding Paste to add leaves to my pumice-enhanced tree. I mixed the paint, then added a small bit of paste to the paint, mixed it, then used a small brush to push leaves onto my branches. The paste really built up on the brush, but it stayed put once I carefully applied it where I wanted it. After a few minutes, I added highlight and shadow to the paste, wet, like I had done with the pumice, but the paste did not respond well. I squished and flattened a few leaves in the process. I should have been more patient, but I like working while everything is still wet.


Tree in the Wind, by Amy Lynn Hess, Golden Artist Color acrylic paint and gels on canvas


Clear Tar Gel


I used the Clear Tar Gel last. Its use as suggested in the literature that came with the set is to use it to drip or drizzle onto a painting using a palette knife. I used it in that way without mixing it with color. For the essence of wind, I made swirls and circles of shine atop the painting. Its consistency is perfect for that type of use, and I like the effect it produced. The shine is nicely juxtaposed with the Coarse Pumice Gel and Light Molding Paste.

Pros and Cons of Using Golden Artist Colors Gel Mediums and Paste


In the past, I have found that gel mediums and pastes become sticky too quickly, they do not mix well with paint, or they sometimes do not stay put on the canvas. Although I experienced some of these negative attributes while using Golden's gels and paste, all in all, it was a positive experience. I was able to work wet into the gritty pumice for a beautiful result, the Clear Tar Gel worked exactly as stated, and although I was slightly impatient with it, the Light Molding Paste dried relatively quickly and kept its peaks and valleys.

I recommend any acrylic painters who may want to expand their uses of textures to try these Golden Artist Color products for themselves.

References


Golden Artist Colors, Inc. (n.d.). Golden Artists Colors Gel Mediums. [Web site]. Retrieved from Golden Paints Website http://www.goldenpaints.com/


Want to read more about painting?  Try

How to Draw and Paint Folk Art Foxes
Painting Supplies for Beginning Acrylic Painters
Escoda MARFIL Brushes for Acrylic Painters


Copyright Amy Lynn Hess. Please contact the author for permission to republish.

Golden Heavy Body Artist's Acrylic Paint; An Artist's Review

A close up of "Tree in the Wind" created with Golden Artist Colors
With the exception of one tube of Golden Artist Color acrylic paint, I have always opted, in the store, for the less expensive brands of acrylic paints. However, I have been disappointed with many of the less expensive options.

As I was throwing out chunky and separated paints that I simply didn't want to have to mix and mash before using, I came across that one tube of Golden paint; it was as smooth as the first day I used it. Suspecting, but not knowing, whether or not the cost versus quality quotient would make a difference, I wrote to Golden to request a sample for testing. I was pleasantly surprised. Golden shipped not only a set of six Heavy Body Acrylics from New York for me to test, but a set of six Gel Mediums and Pastes, as well.

Because of the variety of samples shipped to me, I was able to test these materials in a "studio" test and use them, at hand, while completing a painting. I was also able to test the paints' use in conjunction with the Golden mediums. Beyond the selling points listed in their literature, Golden's Heavy Body Acrylics have competitive advantages over other acrylic paint brands.

An Introductory Set of Six

Golden Acrylic Artists Gels and Paints
I received a set of six paints, including Phthalo Blue (Green Shade), Hansa Yellow Medium, Quinacridone Magenta, Titanium White, Carbon Black, Phthalo Green (Blue Shade), and a Heavy Body Application Guide. With this set, an innumerable number of other colors can be created. As for innumerable textures, I tested these paints in conjunction with Light Molding Paste, Clear Tar Gel, and Coarse Pumice Gel.

According to statements in the supplemental materials and on the tubes of paint, themselves, Golden Artist Colors Heavy Body Acrylics can be used right out of the tube, or they can be mixed with water or a variety of mediums. This series "contains the largest assortment of unique pure pigments in a 100% acrylic emulsion vehicle available to the professional artist," according to the Web site. They go on to say that the paints "offer excellent permanency and lightfastness. There are no fillers, extenders, opacifiers, toners, or dyes added."

The purchase of this set makes it exceptionally easy for a new painter to get started or a more experienced painter to replace core colors without having to worry about long-term fading of color that happens with less expensive acrylic options.

Using Golden's Heavy Body Acrylics


Of all of the selling points listed in the literature, the one most important to an artist's immediate use is the "smooth, thick buttery consistency." The first thing I noticed when using these paints out of the tube was how far they spread on the canvas. Whereas I am used to a dime-sized amount covering about nine square inches, this paint covered approximately fifteen to eighteen square inches. It did not get dry or sticky before I was though covering the desired area. Once applied, though, it did dry quickly, which was fine for this purpose.


The paint was also easy to blend, both with the gel medium and paste, and with other hues. Mixed with the gel medium, it dried more slowly. Mixed with water, the color became very fluid, and I was able to spread a consistent amount of pigment across the surface. It worked well applied by brush, by palate knife, off the palate, and mixed on the canvas.

Furthermore, the Golden Artist Color Heavy Body Acrylics are well packaged. It's easy to squeeze from the tube, and the tube works to "retract" the paint for a clean cap thread. There are hand-painted samples on the front of every tube, so artists can see the dried color before purchasing the paint. The back of the tube offers easy-to-read information as continuum scales for "Transparent versus Opaque," "Matte versus Glass," "Thin versus Thick," and "Low Tinting versus High Tinting." With this information, both beginners and experienced painters can choose the products they want and need.

Competitive Advantages of Golden Paints and Mediums


Golden Heavy Body Acrylics have a clear competitive edge over other brands of acrylic paint. Even when purchased at the same time as paints I have had to throw away, this paint remains smooth. It spreads and mixes more fluidly and evenly than others, and information about the paint is readily available on the packaging. These paints, made in the USA by an employee-owned company, are well worth the purchase price.

References


Golden Artist Colors, Inc. (n.d.). Golden Artist Colors Products. [Web site]. Retrieved from http://www.goldenpaints.com/products/index.php

Sentence Diagramming for Visual and Kinesthetic Learning


An example sentence diagram of a sentence with a compound verb.
Diagramming sentences engages students of all learning style types.

How often do English teachers find that as they’ve been lecturing or drilling on subjects, predicates, participles and gerunds, the students have either been tuning out completely or rushing though the homework incorrectly? 


It was happening much too often in my first few terms teaching freshman English, so I was forced to change my methods. I set aside the assigned textbook to use "in emergencies only." I set aside my notion that diagramming is too elementary for college use, and I turned to the students’ self-identified learning style strengths - visual and kinesthetic.

Although it may seem to be a learning activity appropriate only for grade school, diagramming sentences makes learning or reviewing sentence construction engaging for learners of any age. It’s hands-on, and it allows students the opportunity to step back from the abstract and actually see grammatical patterns in action. Daily diagramming helps students learn to see how words work together to construct meaning in the context of a sentence.  This, in turn, can help them learn to communicate more clearly in any given situation.


Grammar for Visual and Kinesthetic Learners


Once I decided to make a change in the classroom, I informally polled my classes about their learning styles by asking how they think they learn best. The example I gave them as a prompt was the example of fixing a watch. I asked them if they would ask a watchmaker to tell them how to fix a watch, look at a watchmaker’s pictures and diagrams of how to fix a watch, use trial and error on their own, or use another method. The overwhelming majority of students responded they would use trial and error, and then they would ask a watchmaker to show them pictures and diagrams of how to do it if they couldn’t figure it out. On my simple survey, their answers corresponded most closely to the learning style known as kinesthetic or active learning, with a “back-up plan” of visual learning.

In broad terms, kinesthetic or active learners need physical activity during a lesson. At the end of a class, they remember what was done or what took place more so than what was said or shown (Hutton, 2007). Visual learners learn best by seeing colorful charts, diagrams, and tables. They retain information by taking their own notes or highlighting ideas in a text (Clark, 2011). This is not to say that kinesthetic or visual learners cannot learn to be auditory or verbal learners, those who learn by hearing, speaking, or reading. It means only that they learn best by doing and seeing.

Physically Engaging and Visually Stimulating Lessons


Within the first few weeks of daily diagrams in the classroom as the basis for establishing the patterns of grammar, I noticed a difference. Attendance improved (partially due to the threat of losing out on a daily in-class assignment grade), and students started waking up and paying attention. It wasn’t just that we were diagramming in lieu of drilling exercises from the book, however. I gave them a chance to do and see.

I made the process physically engaging: Students rearranged the classrooms in order to work in groups, drew diagrams on the whiteboard for discussion, stood up and created visual aids to help present patterns of grammar to the class, and even found ways to compete by racing to complete complicated diagrams on the whiteboard. They were allowed to make noise, make messy and colorful mistakes, make friends, make connections between ideas, and come to conclusions on their own. The rules for grammar were “discovered” by the students, then validated in short wrap-up sessions at the end of the lesson. Grammar became an active experiment, a way to visually absorb previously mysterious and complicated rules dictated, in black and white, in a textbook.

Exercise Consistency


Additionally, during that first course, I learned that diagramming as the basis for learning requires consistency. Since diagramming is a skill in and of itself, it is important to make the drills and activities a daily activity with short homework assignments as reinforcement. If a student cannot remember how to diagram a simple sentence's subject and predicate, for example, he or she cannot get to the point of diagramming a modifying phrase. That disconnect could be discouraging, so it is vital that students learn proper diagramming techniques.


An example sentence diagram for the sentence "To fogive is divine." A diagram  of a sentence with an infinitive.
Although it may seem a lesson most suited to elementary school students, sentence diagramming can be an invaluable resource for students of all ages and levels; it all depends on the learning styles of the students. Lessons involving sentence diagramming are most suited to visual or kinesthetic or active learners because of the visually stimulating and physically engaging nature of the activity. With repetition and consistency, students can learn to pick out patterns in language use, discover how to properly construct sentences, and learn a new analytic skill in the process.


Want to learn more about diagramming sentences?  Try


Want something more comprehensive? Take my complete online course, "Sentence Diagramming: From Beginner to Expert in 12 Lessons" on Udemy, or purchase my text, Diagramming Sentences: A Playful Way to Analyze Everyday Language (affiliate link) on Amazon.


References

Hutton, S. (2007). Helping Kinesthetic Learners Succeed. Retrieved from Education.com. http://www.education.com/magazine/article/kinesthetic_learner/

Clark, D. R. (2011). Visual, Auditory, and Kinesthetic Learning Styles (VAK). Retrieved from SOS.net. http://www.nwlink.com/~donclark/hrd/styles/vakt.html


Copyright Amy Lynn Hess.  Please contact the author for permission to republish.

Using ChatGPT for Essays in English Composition Classes

The best essays are written by people for people. "Corona Typewriter" image courtesy of the author ChatGPT and other AI language g...