 |
| Use Microsoft PowerPoint to Create Quick and Fun Room Design Layouts |
Rearranging your furniture doesn't have to be a trial-and-error chore, and planning a layout does not require expensive, complicated software.
You can quickly create a room layout, a top-down view of a room, using some
simple mathematics and a few PowerPoint tips and tricks.
Supplies
Begin by gathering your supplies, then taking and saving digital images of your furniture. If you prefer a quicker, easier method, you can forgo the digital images and use the clip art or simple shapes already available to you in PowerPoint or online. If you prefer to use images of your own furniture, take pictures that place the piece of furniture in the center of the image. You will also need the following:- A measuring tape
- A computer or mobile device with PowerPoint
- An array of clip art or various digital images of your furniture
- A calculator if you need help with ratios
Steps
- Carefully measure your furniture’s length and depth. The length and depth measurements of your furniture will later become the height and width measurements of your images.
- Begin a new slide presentation with a blank slide layout. Go to the “Home” tab, then choose the “Layout” called “Blank.”
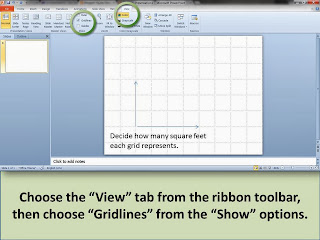
- Next, click on the “View” tab, and choose to show the “Ruler” and “Gridlines.”
- Once you see the gridlines on the slide, you can determine the scale of your layout. For example, if your room is 16’ x 20’, your scale can be 1 grid square to 1 foot of space, or it can be 1 grid square to 2 feet of space, or it can be 1 grid square to 4 feet of space. The ruler will help you determine the proper sizes of your furniture based on the ratio you choose to use.
- Use the “Insert” tab and insert a shape to represent the size of your room. Right click on the shape to change the shape’s size, fill, and outline per your preferences.
- Use the “Insert” tab, then “Picture” to choose to insert your digital images. Use the “Insert” tab, then “Clip Art” to choose pre-existing images. If using Clip Art, search for the type of furniture you’d like include in your room.
- Use the predetermined ratio and your measurements to size the images appropriately. Double-click the images to bring up the “Picture Tools Format” tab to change the size. For more options, right click on the image and choose “Size and Position.”
- Finally, click and drag your images, including doors and windows, to the appropriate place inside your “room.” Make as many changes as you’d like, without straining your back, until your room looks right to you!
Helpful Tip for Parents and Teachers
 This process, though extremely practical for those designing a room, can also be used for educational
purposes. For example, this project can be adapted as a "Design Your Dream
House" project to get students interested in learning ratios and utilizing
the presentation software. In this project, there is motivation for the
students to properly apply the principles of mathematics while stressing the
importance of applying skills across the curriculum.
This process, though extremely practical for those designing a room, can also be used for educational
purposes. For example, this project can be adapted as a "Design Your Dream
House" project to get students interested in learning ratios and utilizing
the presentation software. In this project, there is motivation for the
students to properly apply the principles of mathematics while stressing the
importance of applying skills across the curriculum.No matter the educational or practical use you find for this project, enjoy the process of being creative while learning something new.
Want to read more about how to use Microsoft Office products?
Get Rid of Extra pages in Word Documents
Create an APA Running Head in MS Word
Copyright Amy Lynn Hess. Contact the author to obtain permission for
republication.
.JPG)


No comments:
Post a Comment