 |
| Let all of your source authors "hang out." |
What is a Hanging Indent?
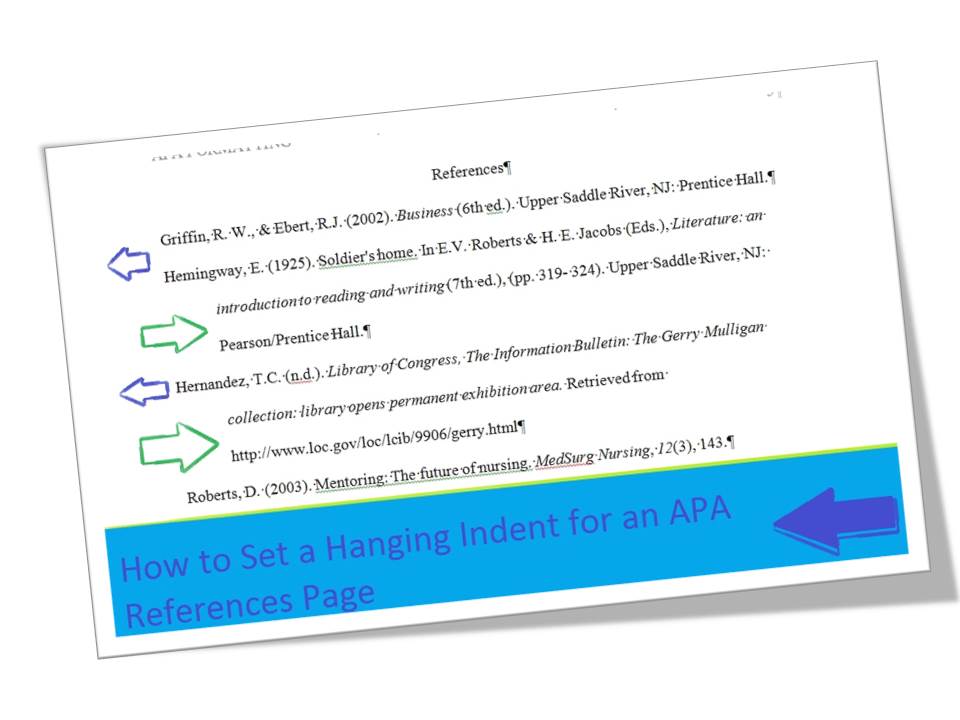
A hanging indent is what most students might think of as a reverse indent. It's when the top line of a paragraph, or in this case a reference entry, is aligned left, while the rest of the lines in the paragraph or entry are indented.
Why Do I Need to Set a Hanging Indent?
The Publication Manual of the American Psychological Association states that a list of references should begin on a new page of your paper with the word "References" centered at the top of the page. They stipulate that reference entries should be double-spaced, and the "APA publishes references in a hanging indent format, meaning that the first line of each reference is set flush left and subsequent lines are indented" (2010, pg. 37).
The hanging indent on an APA references page serves a very important purpose. This formatting allows a reader to cross-reference in-text citations with the complete bibliographic information included on a references page. If you have in-text citations for authors by the last names of Hubbard, Pickens, and Airdale, you'll most likely, unless you interviewed your sources, have complete bibliographic information for those three authors listed on your references page in alphabetical order. The last name of the author in your in-text citation matches the last name on the first line of your entry, making it easy for a reader to find.
For example, you might have an in-text citation that looks like the following:
According to an article published in The Formatting Magazine on June 8, 2012, "APA formatting is a fascinating topic" (Pickens, pg. 4).
The reference entry for that quotation would then appear on the references page in proper APA fashion with a hanging indent. The first word in the entry would be "Pickens." Without a hanging indent, however, the reader would have a hard time picking "Pickens" from the other entries, especially if there were ten, twenty, or thirty entries. Without a hanging indent, the reader simply sees a dense block of text:
Airdale, G. (2012). WOO! APA. Boston, MA: Fake Publishing Company.
Hubbard, N. F. (2009). A response to Airdale's claim that APA is something to woot about. Online APA Forum Journal. Retrieved from http://www.onlineforum_responsestoairdale
Pickens, G. L. (2012). Say yes to APA formatting. The Formatting Magazine 2(3) p. 4-5. Retrieved from http://www.theformattingmagazine_APApickens
How Do I Set a Proper APA Hanging Indent Using Microsoft Word?
There are many ways to set a hanging indent. However, knowing how to set a hanging indent without any auto-formatting really is the easiest way to go about it. These are the instructions for setting a handing indent using Microsoft Office Word 2010.
- First, be sure the cursor is at the top of a new page immediately following the conclusion of the paper. It's best to insert a page break after the last word of the conclusion.
- Check to be sure your margins for the document are set to 1 inch on all four sides of the page.
- Be sure your "Paragraph" settings for "Before" and "After" spacing are both at 0 and the line spacing is at "Double" for your entire document.
- Make sure all of your text is set for Times New Roman 12 point font.
- Last, but not least, make sure you have not inadvertently deleted your running head.
- Use the "Home" tab "Paragraph" settings to center the first line of the new page and type the word "References." Do not underline, italicize, or set the font to bold.
- Type "Enter" to move to the second line of the page.
- From the "Home" tab "Paragraph" menu, reset the second line page alignment to left align.
- Using your APA Publication Manual or abbreviated APA citation guide, create all of your reference entries without concern for the hanging indent. Simply press "Enter" between entries.
- If you have not typed your entries in alphabetical order, highlight them using your mouse and drag them into alphabetical order.
- When you've finished typing all of your entries and they are in alphabetical order, from the "View" tab, choose to show the ruler.
- Use the mouse to highlight all of your reference entries, but just the entries.
- Without clicking anywhere else on the page, use the left ruler sliders to set the hanging indent. It's comprised of three shapes: a top triangle pointed down, a bottom triangle pointed up, and a square. Click and drag the bottom square to the 1.5 inch mark (to the right of the current margin). Release the mouse. Be sure your reference entries are still selected. Click and drag the downward-facing top triangle back to the 1 inch margin (back to the left).
- All of your reference entries should now have a hanging indent!

.JPG)


or just use the hanging indent feature
ReplyDeleteHi there! The reason I recommend learning the hanging indent manually is because there are times when the formatting features will not allow a writer the opportunity to customize the indent. For example, in APA, a References page can be either double-spaced or set to 1.5 to conserve page space. Additionally, students whose Word programs are set to page sizes other than American will see a size difference in their margins. Learning to manually set parameters also teaches students and writers to check the ruler for more than just a hanging indent: Many times, students will ask why their headings aren't centered when they use the automatic centering button in the paragraph grouping on the ribbon toolbar, and the reason is simply that the auto formatting they have used to set their paper's parameters have skewed the center and indented the line. Viewing the ruler and using the ruler will prevent those issues, as well.
DeleteThanks for your comment!
Helpful post.
ReplyDeleteThank you very much. I was having problems with this until I watched your video.
ReplyDelete