Welcome!

Do you have APA formatting questions? Thesis statements got you down? Need to study grammar? Need some help with critical thinking? Having trouble with literary analysis or research? Want to take a look at some example essays? Well, I probably have a post here somewhere that can help you. Please use "Search This Blog," the "Labels," or my "Blog Archive" to help you find what you need. Have questions about what you find? Please feel free to comment or ask questions. I do moderate comments, and I try to respond to all topical questions and comments in a timely manner.

Thursday, August 14, 2014

How to Write Recipes

A cookbook lays open in a lovely kitchen and a lemon meringue pie sits finished.

Written recipes are a type of expository writing.  The goal of a recipe writer is to explain to a reader how to prepare a dish.


Minimally, a recipe includes ingredients and step-by-step  instructions.  Sometimes a recipe includes a list of required equipment or skills. In addition to those basics, however, there are many other ways to liven up a recipe.  Sometimes a recipe writer will add nutritional information, a brief history of the dish or ingredients, or add alternative methods or dietary requirement instructions.  As readers, we may take a recipe writer's writing skills for granted as we drool over beautiful photographs of the finished product.  We shouldn't.

In addition to the recipe's content, a recipe writer must also pay special attention to writing conventions.   The grammar and mechanics of writing a recipe are just as important, if not more so, than in any other piece of expository writing.


Measurements and Abbreviations

First, a recipe writer must adhere to a consistent set of measurements and abbreviations.  Can you imagine a new baker reading a recipe and trying to figure out how to combine 4g of baking powder with 1C of flour and 2 ounces of baking soda?  What about .5L of milk?  How about if it said 4 TBS or 4 TBLS or 4 TSPS?  Is 4 tsp the same as 4 TSPS?  And aren't ounces for liquids?  Some fortunate souls might be able to work it out, but others will not.  Therefore, it is essential that a recipe contain measurements and abbreviations consistent with the conventions accepted by the intended audience and consistent within the recipe - not changing willy nilly in the midst of the recipe.

Verb Tense and Order

Second, a recipe writer must use the proper verb tense and explain the cooking steps in such a way that they are easy to follow.  In other words, it's important to clearly tell the reader when tasks and steps should be completed by using a clearly defined step-by-step order.  A new cook might truly appreciate the instructions to preheat an oven while whisking eggs, or to add chopped nuts only moments before placing a bread into the oven. However, if the instruction to preheat the oven appears after the instruction to add chopped nuts, the instruction to add nuts moments before placing the bread into the preheated oven will be for naught.

A recipe will also read more smoothly if verbs are consistent with previous verbs.  It will read even more smoothly if the structure of each step emphasizes the verbs.  For example, each new step can begin with "chop," "dice," "saute," "steam," or "grate."

Vocabulary and Terminology

Third, when writing a recipe, the vocabulary of cooking must be used correctly.  "Saute" and "fry" may seem like the same thing to some cooks, but they really are not.  Likewise, to use the zest of lemon is not the same as using a lemon.  And can you imagine what might happen if you label a recipe gluten-free when it is not, or vegan when it is really vegetarian or pescatarian?  It is essential that the specific language of cooking, all the jargon and vocabulary associated with cooking, be used appropriately.

The main goal of a recipe writer is to help the reader recreate a favorite dish based on the written recipe.  That requires recipe writers pay very close attention to some very specific writing conventions in order to successfully meet that goal.


Copyright Amy Lynn Hess.  Please contact the author for permission to republish.

Wednesday, August 6, 2014

How to Paraphrase Source Content

An actor presents Act V Scene 1 from Hamlet, much to the confusion of the man on the left.
Comprehension is key to a successful paraphrase.
There are three ways to incorporate ideas from another writer into your own papers.  First, you might quote the original source.  Alternatively, you could summarize the main idea or ideas from a source.  Third, you could paraphrase the original by putting it into your own words while still expressing the context and tone of the original.

Of the three, I believe paraphrasing is the trickiest to master, as it requires complete comprehension of the original and a strong understanding of how to rephrase the original idea in context and in your own words.


A Paraphrase Requires Complete Comprehension of the Original Source Content 

First things, first:  In order to rephrase someone else's words, you must thoroughly understand the original.  For example, do you thoroughly understand the following sentence from a United States government memo written during World War II?

Such preparations shall be made as will completely obscure all Federal buildings and non-Federal buildings occupied by the Federal government during an air raid for any period of time from visibility by reason of internal or external illumination.

Franklin Roosevelt, the United States President at the time, found it difficult to understand.  However, once he worked out its meaning, he paraphrased it as "Tell them that in buildings where they have to keep the work going to put something across the windows."


A Paraphrase is a Rephrase the Original Source Content

In order to ethically paraphrase an original bit of text, the writer must put the idea into his or her own words, or use quotation marks to set apart any key words or phrases he or she doesn't change, and then attribute the original to the original writer.  Let's look at an example.

James Thurber once said "There is no good writing, only rewriting."  If I wanted to borrow that, I could learn it by heart and let others know I was quoting James Thurber, or I could try to paraphrase the idea - and still let others know the idea came from James Thurber.  I might say, "To paraphrase James Thurber, rewriting makes writing effective, not just writing." 

Always make sure the paraphrase is truly in your own words and not too close to the original.  Otherwise, you might be accused of plagiarism.


A Paraphrase Must Maintain the Original Content in Context

Mike Palmquist, writer of The Bedford Researcher, offers the following advice about paraphrasing in context:

"To provide a clear context for your source information, establish why the quotation, paraphrase, or summary is reliable by identifying the source's credential's.  In addition, indicate how it relates to your main idea and what it contributes to the point you're making." (pg. 252)

To paraphrase, you should always make sure a reader can tell the difference between your own writing and the paraphrased content of others.  Furthermore, you should make sure your readers know why you've included the paraphrased material by making sure you tell them how the content supports your own idea.  

For example, instead of stringing together a list of paraphrased facts . . .

While President Clinton was in office, private sector jobs grew more than at any other time in U.S. history.  While he was President, democrats held the majority in Congress.  President Obama's term in office has not seen such growth.  Republicans control Congress.

Make sure the reader knows where your information originated and what point you are trying to make by including it.  

Private sector job growth can be influenced by a number of factors.  One is the cooperation between the executive and legislative branches of government.  For example, while President Clinton was in office, private sector jobs grew more than at any other time in U.S. history (Jackson, 2006, para. 6).  Contributing to the successful jobs numbers was his ability to work seamlessly with the legislative branch: While he was President, and a democrat himself, democrats held the majority in Congress.  On the other hand, President Obama's term in office has not seen such growth (Smith, 2014, pg. 578).  As the republicans control Congress, they are seemingly unwilling to cooperate with President Obama, a democrat.


If you continue to practice diligently using and citing paraphrased source content, you will get more and more comfortable and adept at taking a bit of information, unraveling it, and rephrasing it in context.


Try my complete online essay writing course on Udemy Writing for English Composition: College Essays.

Thursday, July 31, 2014

How to Summarize Source Content

One way to increase the credibility of your ideas is to incorporate expert ideas into your own writing with summary material.


What's summary material?


A stack of books is bigger than a summary on a piece of paper.
Can you summarize your favorite novel or film?
Unlike a quotation, which is an exact replica of another writer's original words, sentence or sentences, a summary "is a concise statement, written in your own words, of information found in a source" (Palmquist, 2012, pg. 257). For example, you can't possible quote an entire chapter in a textbook, but you could summarize its main point.  You might also summarize the main point of an entire article or entire book, or even just one paragraph.  The important thing is that you make your summary original, concise, and use it in such a way that the reader knows you have borrowed the information.  In other words, always cite summary material, and add it to your paper using attribution words.


Can you show me an example of summary material?


When summarizing an entire article on poisonous spiders, for example, a writer might compose the following paragraph:

It's exceptionally important that people enjoying the outdoors be able to identify poisonous spiders indigenous to the area where they are spending their leisure time.  Misidentifying a poisonous spider might have traumatic results.  For example, Dr. Sam Wessel, in an article called "A Guide to Poisonous Spiders Across the World," tells how, in 1994, his brother misidentified a spider in the desert as being a benign spider from his hometown in Ohio, a forested area.  The misidentified desert spider was extremely poisonous, and as a result of the confusion, his brother lost his entire arm by the following year (2009).


What makes a summary a good summary?


The writer of the previous paragraph follows all of the rules for using summary material.

  1. The original article was several pages long, but the summary concisely reiterates just the main point that supports the topic sentence of the paragraph.  
  2. Furthermore, the writer was successful in letting readers know where they can find the original, like when I wrote "in Dr. Sam Wessel's article, "A Guide to Poisonous Spiders across the World," which was published in 2009. . ."  
  3. We can also easily tell which information from the paragraph belongs to the original writer, and which information came from Wessel.


To summarize using summary material, be sure the information you summarize is pertinent to your own, original point.  Make sure the reader can distinguish your own ideas from the ideas that came from a source.  Last, but not least, make sure you cite the summary material.


References


Palmquist., M. (2012). The Bedford Researcher (4th ed.). Boston, MA: Bedford's/St. Martin's.


Try my complete online essay writing course on Udemy Writing for English Composition: College Essays.

Wednesday, July 23, 2014

How to Crochet: American Single Crochet or British Double Crochet

A stocking cap shows the crochet symbol for a single crochet and reminds us that a single crochet stands 1 loop tall.
The American Single Crochet stitch is also known as the British Double Crochet.

The American single crochet stitch, also known as the British double crochet stitch, is an easy-to-learn basic stitch that any beginner can master.


The single crochet is a great stitch for making projects that require a fabric that isn't too "holey."

For example, the single crochet stitch can be used for washcloths, hot pads, slippers, tablecloths, jewelry, scarves, bags, purses, amigurumi, blankets, bowls, felted fabrics, ornaments, and clothing.  The texture of the fabric can be altered by using different size hooks with the appropriate weight of yarn.


Want to Learn the Single Crochet?


By watching a few videos and remembering the sing-song mantra "around, through, pull through one, pull through two," you, too, could soon be making your very own projects while reaping the many mental health rewards of this craft . . .

because . . .

if you didn't already know, just the act of crocheting, itself, has an added benefit:  Crocheting is good for your mental health!

  1. First, it's a very good form of stress relief and can be therapeutic for many people. 
  2. Second, it's a relatively inexpensive, creative outlet.
  3. Third, it's also a great way to connect with others, and 
  4. fourth, it also helps people give back to their communities.  
As a matter of fact, a psychologist friend of mine recently told me crochet is even sometimes used to treat PTSD or severe anxiety.  A skein of yarn and a hook cost under $10.00.  There are a multitude of online groups and local classes for learning to crochet, and, according to Wikipedia's Crochet entry, some ways people give back are to create clothes and blankets for soldiers, cancer patients, homeless shelters, newborn babies, and nursing homes (para. 43).


Are you ready to pick up a hook and learn how to crochet?


Try my complete online crochet course, "Crochet for Stress Relief" on Udemy.com.  

Monday, July 21, 2014

Outlining an Essay

The thesis goes on the outline, then the topic sentence, then the evidence.
Are you skipping or under-utilizing this important step in the writing process?

Having trouble writing essays?  It may not be that you're a bad writer. You just could be skipping or under-utilizing one of the most important steps in the writing process: outlining.


Outlining helps writers save time, focus on main ideas, write more clearly, and add coherence to essays.

Outlining Saves Time

Before writing an essay, you should create an outline to help you organize your thesis, main ideas, and evidence.  Using the outline to pre-plan an essay helps you save time by helping you ensure that what you put down on the page the first time is what you mean to put down on the page the first time.  You will spend less time revising and editing drafted paragraphs if you spend some time planning key ideas before you  draft complete paragraphs.

Outlining Helps Writers Establish Unity

When outlining, you should begin by placing your thesis statement on your outline so that it leads all of your additional points.  Next, add your topic sentences, the complete thoughts you're going to give the reader that each support a piece of your thesis statement.  This will help you ensure overall unity for the entire essay.  Then, add your evidence under each appropriate topic sentence. This will help ensure unity within individual paragraphs. The lead-in and summary portions of the introduction and conclusion can be added last.

One type of outline that is familiar to most people is a table of contents.  Notice how writers break their ideas into main ideas and sub ideas in a table of contents, and information about those ideas can be found under those particular subheadings.  The same idea applies to an outline for a paper.

Outlining  Helps Writers Maintain Clarity

Placing all of your ideas on an outline after prewriting can help you maintain clarity.  You can look at an outline, each of its parts, to check whether or not you have included enough evidence to support each main idea or topic sentence.  You may realize, when you glance at the outline, that all of your evidence supports only one or two topic sentences and that other topic sentences are left unsupported.  If that's the case, you can complete some research, do some more prewriting to brainstorm examples, reword your ideas, or combine ideas to better balance and support your thesis.

Outlining Helps Ensure Organization and Coherence

Simply writing an essay start to finish as ideas occur to you will make for a very unorganized mess of ideas. Unorganized messes of ideas make for very bad reading, and you want all of your ideas to be understood by your reader, right?  An outline can help you organize your ideas effectively.  Once your ideas are on the outline, you can rearrange them to suit your purpose.  For example, if your purpose is to compare and contrast solutions to a problem, you can look at your outline and determine if the order in which you've placed your ideas will help your reader see the similarities and differences easily.  If not, you can rearrange ideas on an outline a whole lot easier than you can rearrange ideas after you've drafted entire paragraphs.

The steps in the writing process are tried and true, but oftentimes new writers skip steps in order to "write faster."  In the end, it doesn't pay off, and those writers spend more time revising for major errors.  Skipping the outlining step in the writing process could prove to be detrimental to an essay's unity, coherence, and clarity.


Want to learn more about writing essays?  

Try my complete online essay writing course on Udemy Writing for English Composition: College Essays.


Copyright Amy Lynn Hess. Please contact the author for permission to republish.

Wednesday, July 16, 2014

Sentence Diagramming: Wise Words Wednesday

Diagramming Wise Words by Will Rogers


Will Rogers, American cowboy humorist and social commentator, once said "Even if you're on the right track, you'll get run over if you just sit there." Those were wise words, as they remind us that we must always take responsibility for our own lives, our own direction, and our own continuous self discovery and accomplishments.  


Let's discover and a accomplish a little bit today, using Will's wise words as a springboard into a lesson on diagramming sentences.


Identify Clauses

This sentence has three subjects, all "you," paired with three different predicates: "you'll get run over," "you're," and "you sit."  Two of those subject-predicate pairs begin with subordinating conjunctions, "if," and "Even if."  That means those two pairs are subordinate to a main clause, "you'll get run over."

We must diagram the main clause above the others to leave room for the subordinating conjunctions to be diagrammed below the main predicate. Draw your three base lines as shown in the image at the top of this post.

Fill in the Subjects and Predicates

Place all of the "you" subjects in the appropriate space to the left of each of their respective base lines.  Add the predicates on the right sides of the base lines.  Be sure to add the vertical line between the subject of each clause and the predicate of each clause.

"Run Over" as a Phrasal Verb

When it comes to diagramming "run over," don't confuse "over," the particle, for "over," the preposition.  In this instance, "over" is part of the verb.  In English we use "run over" as one verb to describe one specific action.

Contractions

When it comes to diagramming "you'll" and "you're," be sure to separate the pronouns from the verbs.  It may look a bit odd to have "'ll" and "'re" on your diagram, but it is accurate and correct to do so.

"If" and "Even if" as Subordinating Conjunctions


Coordinating conjunctions are diagrammed on a "step," and subordinating conjunctions are diagrammed on a diagonal.


As stated earlier, "Even if" and "if" are subordinating conjunctions.  They are diagrammed on dashed lines that connect the verb in the main clause to the verbs in the subordinate clauses.  Whereas coordinating conjunctions are diagrammed on the horizontal part of a "step," subordinating conjunctions are simply diagrammed on a diagonal.

Diagramming the Prepositional Phrase "On the right track"

"On the right track" is a prepositional phrase.  "On" is the preposition, and "track" is the object of the preposition.  Prepositions are diagrammed on a diagonal line under the words they modify, and the objects are diagrammed on horizontal lines that stem from those diagonal lines.


Diagramming the Modifiers

The modifiers we have yet to diagram are adjectives and adverbs.  "The" and "right" are both adjectives, and they are diagrammed under the noun they modify, "track." "Just" and "there" are both adverbs, so they are diagrammed underneath the predicate verb they modify, "sit."

Thereby we get the diagram pictured at the top of this post, the wise words by Will Rogers,

"Even if you're on the right track, you'll get run over if you just sit there." 


Want to learn more about diagramming sentences?  

Take my complete online course, "Sentence Diagramming: From Beginner to Expert in 12 Lessons" on Udemy, or purchase my text, Diagramming Sentences: A Playful Way to Analyze Everyday Language (affiliate link) on Amazon.


Copyright Amy Lynn Hess.  Please contact the author for permission to republish.

Friday, July 11, 2014

How to Use Quotations as Source Content in Essays or Speeches

A man take an oath on a bible and swears to tell the whole truth and nothing but the truth about his source content.
Quotations can add a lot of credibility to your argument.
However, you should use them carefully and sparingly.

When using the words of others, an ethical consideration writers must make is to credit those others.  Failing to give credit to original authors, or severely overusing content written by others, is a serious violation of academic honesty.  That violation is called plagiarism.


Here are three key ideas to keep in mind when you feel you must quote, or use the exact words of others, to support your own ideas.


1. What's the first rule of using quotations in your papers?  Quote only when necessary.


There are times when only the exact words of a source author will do the information justice.  For example, when quoting something clever, figurative, or full of expression that adds to its meaning, only the exact words of the writer will suffice.  On the other hand, there are a lot of times when information could more easily be paraphrased or summarized to fit more neatly into your own writing.  Of course, you must still give credit by attribution or using a citation whether the information is quoted, summarized, or paraphrased. 

Fair warning: Never quote material out of context or with an incomplete understanding of the material.  This always leads to weak writing, or worse, inaccurate or even unethical writing.


2. Weave quotations seamlessly into your own sentences. Use attribution to add ethos.


Even when using the exact words of another writer, you must weave those words into your own writing.  What I mean is, you should introduce the quotation, give the quotation, and show its relevance to your own ideas all within one or two connected sentences.

Take a look at the difference between the following two examples.  The first is choppy and seems incomplete.  The second weaves the quotation seamlessly into the author's own sentences, the first of which is a topic sentence that is then supported by and added to by the quotation from an identified expert.  There is also a transitional device, "According to," that makes it clear to the reader the idea is shifting from the writer's own writing to the ideas of a source author.


  • Original

“It’s overuse in the last part of the century (especially by Euripides, who often employed gods to resolve his plots) led to the term deus ex machina, god from the machine, to describe any contrived ending” (Brockett & Hildy, 2008, pg. 27). 


  • Revised

However, as time went on the physical mekane came to be relied upon not only as part of plays’ spectacle and staging, but as a plot device. According to Brocket and Hildy, writers of History of the Theatre, “It’s overuse in the last part of the century (especially by Euripides, who often employed gods to resolve his plots) led to the term deus ex machina, god from the machine, to describe any contrived ending” (2008, pg. 27). 

As a bonus, when you use the words or ideas of credible and authoritative experts and brag about them a little bit the first time you refer to them, you borrow a bit of their credibility and authority, which adds to the ethos of your own ideas.

3. Give full credit to the original author.

Most importantly, even if you aren't bragging about the credibility and authority of your source, always give full credit for quoted source content to the source author, publisher, or editor.  

  • Always write down all pertinent information about a source when you find it, so that no matter which style guide you are asked to use, you will have the information necessary to cite your sources, both in the text of the paper and on a bibliography page.  
  • Always use quotation marks to designate quoted material.  Make sure quoted material is transparent and easy to distinguish from your own ideas.
  • Always revise if there is ever any ambiguity about whether information in a paper is source content or the writer's own words.

In other words, use source content you're proud to use, and briefly brag about your sources in the text of the paper (i.e., "writers of History of the Theatre").  Make the reader understand that your source content is both relevant and authoritative.

To summarize, using source content requires an ethical consideration, which is to avoid stealing source content and claiming it as your own.  In order to avoid that plagiarism pitfall, always give credit to the original author, weave quotations into your own writing, and only use quotations when necessary.


Need to know more?  Try

Giving Speeches: The Ethical Use of Source Content
Avoid Unintentional Plagiarism
Evidence: Writing Well-Supported Paragraphs
Research and Writing Basics: Evaluating Source Content


Looking for a complete online writing course?

Try my complete online essay writing course on Udemy Writing for English Composition: College Essays.

Enjoy!

Tuesday, July 8, 2014

Four Thieves Blend Hand Salve

Image of a lemon, cinnamon, rosemary sprig, and eucalyptus sprig.
It keeps my hands soft and is rumored to ward off the plague!

I recently learned of an essential oil blend called Four Thieves Blend, and I decided to put its use to test in the form of a hand salve.


Four Thieves Blend has a long and varied history, including use by physicians and citizens in England and France during the long history of the plague (Young Living Essential Oils, 2012).  It is rumored that grave robbers during the 15th Century used a blend of herbs and vinegar to protect themselves from the plague-ridden bodies they were robbing.  When caught, the rumor goes, they fessed-up to having used the herbs in order to be given a lighter sentence (Wolansky, 2012; Young Living Essential Oils, 2012).

The Four Thieves Blend Oils

There are several practical applications for this blend in the 21st Century, including cleaning kitchen and bathroom surfaces, scrubbing floors, polishing furniture, warding off illnesses, and making homes smell nice. Whether or not the historical plague-fighting rumors are true, the oils used in the blend, including clove, lemon, cinnamon bark, eucalyptus, and rosemary, have “antiseptic, antiviral, antibacterial, and anti-infectious properties” (Wolansky, 2012).

Although there is a brand name for this blend of essential oils, I chose to create my own blend using the recipe available on the Mountain Rose Blog and essential oils from our local health food store.  Because I am already aware of the warming properties of clove and cinnamon by way of teas and powders, I was interested in taking full advantage of the warming properties of the clove, cinnamon and eucalyptus oils in a new way. I looked for ways to incorporate this blend into a solution for my often cold hands and feet, and after looking through several books and Web sites about herbal properties and the use of essential oils, I decided to create a simple salve to apply to my hands and feet that should warm them when applied.  That the salve might ward off the plague without harsh pharmaceuticals I feel is definitely a bonus.

Making a Hand Salve

My first step was the test my sensitivity to the oils, so I applied one drop each of clove, cinnamon, lemon, rosemary, and eucalyptus to my wrist.  I could feel the skin tingle and warm, but my skin did not turn red or irritated, so I continued with my salve.

In order to create my salve, I used items I had in my home.  I used ¾ cup safflower oil, an oil known for its moisturizing and anti-inflammatory properties, and approximately 1 ounce of paraffin wax.  To the bottoms of each of two small canning jars, I added 15 drops of my homemade Four Thieves Blend, plus an extra 10 drops each of clove, cinnamon, and eucalyptus oils. I melted the paraffin wax with the Safflower oil in a saucepan on the stove, and I slowly spooned it into the small canning jars.  I let the salve cool completely before adding the lids so as to prevent would-be condensation in the jars.

Using the Hand Salve

The salve firmed to a state the consistency of petroleum-jelly, and a little went a long way when applied.  I applied a fingertip amount to my hands, then used what was left on my hands to rub my feet.  I put socks over my feet and went to bed.  The tingling and warming was weaker, of course, than with the undiluted drops I had tested, but I could feel the warmth of the oils. The Safflower oil also lived up to its reputation, and my hands and feet felt exceptionally smooth in the morning.

If you try or have tried various uses and recipes for Four Thieves Blend, please share your own experiences and recipes with me in the comments section below this post.  As a side note, if I were to make another batch, I would probably use coconut oil instead of safflower oil to keep the salve more firm.

Special Note

Please keep in mind that if you choose to try this for yourself, you must follow some safety precautions. When creating my salve, I did heed the safety warnings given by the makers and sellers of the essential oils. First and foremost, these essential oils are not meant to be ingested. Secondly, I played it safe with the salve and did not add too much of any one of the essential oils because some people have sensitivity to certain oils. I will test the salve and strengthen or weaken it as per my family’s needs.  Even though my method was more experimental than professional, I took the appropriate measure to remain safe in the kitchen.

Additionally, please consult a doctor for any serious medical condition.  I do not recommend essential oils in lieu of proper medical care.

References


  • Young Living Essential Oils. (2012). Four Thieves Vinegar: Evolution of a Medieval Medicine. Retrieved from http://www.secretofthieves.com/four-thieves-vinegar.cfm
  • Wolansky, I. (2012). Recipe: Four Thieves Oil. The Mountain Rose Blog Daily Herbal Musings. Retrieved from http://mountainroseblog.com/thieves-oil/


Copyright Amy Lynn Hess. Contact the author to obtain permission for republication.

Sunday, June 29, 2014

Crochet Some Slippers!

A bright blue crochet slipper with stitch direction arrows.
Crochet this slipper by following the stitch direction arrows.

Everyone gets cold feet. When there's a nip in the air, nip cold feet in the bud!


Crochet Slippers Pattern

This is a crochet pattern for the average lady's size slipper, American sizes 7 - 9, UK sizes 5 - 7, or European sizes 38 - 41.  I adapted this pattern from some other patterns I have seen online that require sewing together either the heel or toe of the slipper.  Instead, the body of my adapted slipper is made in one piece, with no need to sew or bind off until the end.

To create this slipper I used a size "G-6" 4 mm hook with a worsted medium acrylic yarn.  I have approximately 4.5 stitches per inch.


Required Skills


  • Chain (ch)
  • American single crochet (sc)
  • Slip stitch (sl st)
  • Increasing the single crochet
  • Decreasing the single crochet
  • Turning
  • Working in the round (rnd)


Begin with the Toe

The toe of the slipper will be worked in the round, with a slight increase nearest the toes.


  • Foundation Rnd: Ch 10.  Sc in 2nd ch from hook, sc in next 7 sts, 3 sc in last ch. Do not turn. Rotate work 180 degrees. Sc in bottom loop of next 7, 2 sc in bottom loop of last, sl st to beg sc to join rnd -- 20 sts total.
  • Rnd 1: Ch 1 (counts as 1st sc), sc in same st, sc in next 7, 2 sc in next st, sc in next st, 2 sc in next st, sc in next 7, 2 sc in next st, sc in last st, sl st to beg ch to join rnd -- 24 sts total.
  • Rnd 2: Ch 1 (counts as 1st sc), sc in same st, sc in next 9, 2 sc in next st, 1 sc in next st, 2 sc in next st, sc in next 9, 2 sc in next st, 1 sc in last st, sl st to beg ch to join rnd -- 28 sts total.
  • Rnd 3: Ch 1 (counts as 1st sc), sc in same st, sc in next 11, 2 sc in next st, 1 sc in next st, 2 sc in next st, sc in next 11, 2 sc in next st, 1 sc in last st, sl st to beg ch to join rnd -- 32 sts total.
  • These crochet slippers are made as one piece.
    No extra sewing!
  • Rnd 4: Ch 1 (counts as 1st sc), sc in each st around, sl st to beg ch to end -- 32 sts total. Repeat Rnd 4 until the piece measures 4 - 5" from toe, depending on your preference.


Working the Side Quarters

You will now begin working flat rows to create the side quarters of the slipper.


  • Row 1: Do not ch. Sc in next 4 sts, turn.
  • Row 2: Ch 1, sc in next 24 sts, turn.  Repeat Row 2, crocheting back and forth, until the sole of the slipper measures between 8 - 10 inches, depending on the desired length.


Creating the Heel

Once your slipper reaches the desired length, you must finish the slipper by creating the heel.  You will be creating a circle that grows smaller with each new round.  Begin at the end of the last row.


  • Row 1: Do not turn.  Ch 8. Sl in st of the opposite side to create a rnd.
  • Row 2: You may now turn if you have crocheted on the "wrong side" or inside of the pattern.  You should work on the outside of the slipper.  Ch 1.  Sc in each st of the round, including the new chain. Sl st to beg ch to end.
  • Row 3: Ch1. Sc in next st.  Decrease by skipping a st.  Sc in next 2 sts.  Repeat until you end the round.  Sl st to beg ch to end.
  • Row 4: Ch1. Sc in next st.  Decrease by skipping a st.  Sc in next 2 sts.  Repeat until you end the round.  Sl st to beg ch to end.
  • Row 5: Ch1. Sc in next st.  Decrease by skipping a st.  Sc in next 2 sts.  Repeat until you end the round.  Sl st to beg ch to end.
  • Row 6: Do not ch.  Sl st across the remainder of the sts and bind off.


Slipper Edging

Join the yarn the back of the heel to create an edging.


  • Rnd 1: Work sc evenly around entire ankle opening as an edging. Use the formula of 4 - 5 sts per inch to help you space your sts.
  • To finish: Be creative! Choose an edging that is attractive to you: Change colors, perhaps add a rnd of double crochet and weave in a ribbon, or create a tall ankle and fold it over.  Add buttons, flowers, or bows.  However you finish them, make them distinctly yours.

Want to learn more about crochet?  

This lush afghan is colorful and easy enough for any beginner to create.

Try my complete online course, "Crochet for Stress Relief" at Udemy.com.   Once you sign up, you have lifetime access.  Learn at your own pace; there's no hurry.


Copyright Amy Lynn Hess. Contact the author to obtain permission for republication

Monday, June 16, 2014

Cheesy Kale Salad with Blueberries and Almonds

Parmesan cheese sprinkled on a lightly warmed kale and served with almonds and blueberries.
Cheesy Kale Salad with Blueberries and Almonds

What kind of salad do I serve at Chez Moi when we haven't been grocery shopping in a while? Leftover salad, of course!  


I took a little bit of "this" and a little bit of "that" from our weekly leftovers, and voila:  I came up with a tasty salad!  Blueberries from pancakes on Sunday, kale from the soup on Monday, and grated Parmesan cheese from the spaghetti on Tuesday . . . . That's how this wonderful concoction came to be, and I'm really glad  I thought of it because it was a hit!

Ingredients

There are 6 ingredients in this salad, and none are difficult to come by.  As I said, I had all of these in my fridge as leftovers or staples.


  •  2 Cups Chopped Kale
  • 1/2 Cup Fresh Blueberries
  • 1/4 Cup Raw Almonds
  • 3 Tablespoons Parmesan Cheese
  • 3 Tablespoons Coconut Oil
  • 1 Tablespoon Apple Cider Vinegar


Warming the Kale & Presenting the Salad

  1. Slice your kale leaves from the spines.  Chop your kale into pieces to suit your taste.   
  2. Toss the chopped kale and almonds in coconut oil and apple cider vinegar.   I placed mine in a large mixing bowl, covered the bowl with a lid, and shook it all up a bit.  The idea is to make sure the kale is evenly coated with the oil and vinegar.
  3. Place the kale and almonds onto a baking sheet, and put the baking sheet on the center rack in the oven at 350 degrees for 5 - 10 minutes to warm it or crisp the edges, depending on your preference.  If using a toaster oven, shorten the time and watch it closely because the kale will be much closer to the heating element in a toaster oven.  
  4. Remove the baking sheet from oven and, while it's warm, sprinkle the kale with the grated Parmesan cheese . 
  5. Place the salad in a serving dish or dishes,  and add the blueberries on the side for a pretty presentation.


Nutrition Information

I used the handy MyFitnessPal recipe calculator to compile a few brief nutritional facts about this salad.  This salad, divided evenly between two people, is 354 Calories per person and contains 140% the recommended daily allowance (RDA) of Vitamin C.  So, not only is this salad easy, but it's not too bad for you, either!

Hopefully, I'll have all of these leftovers in my fridge, again, in the near future.  We can't wait to have this with dinner, again!


Copyright Amy Lynn Hess.  Please contact the author for permission to republish.

Monday, June 9, 2014

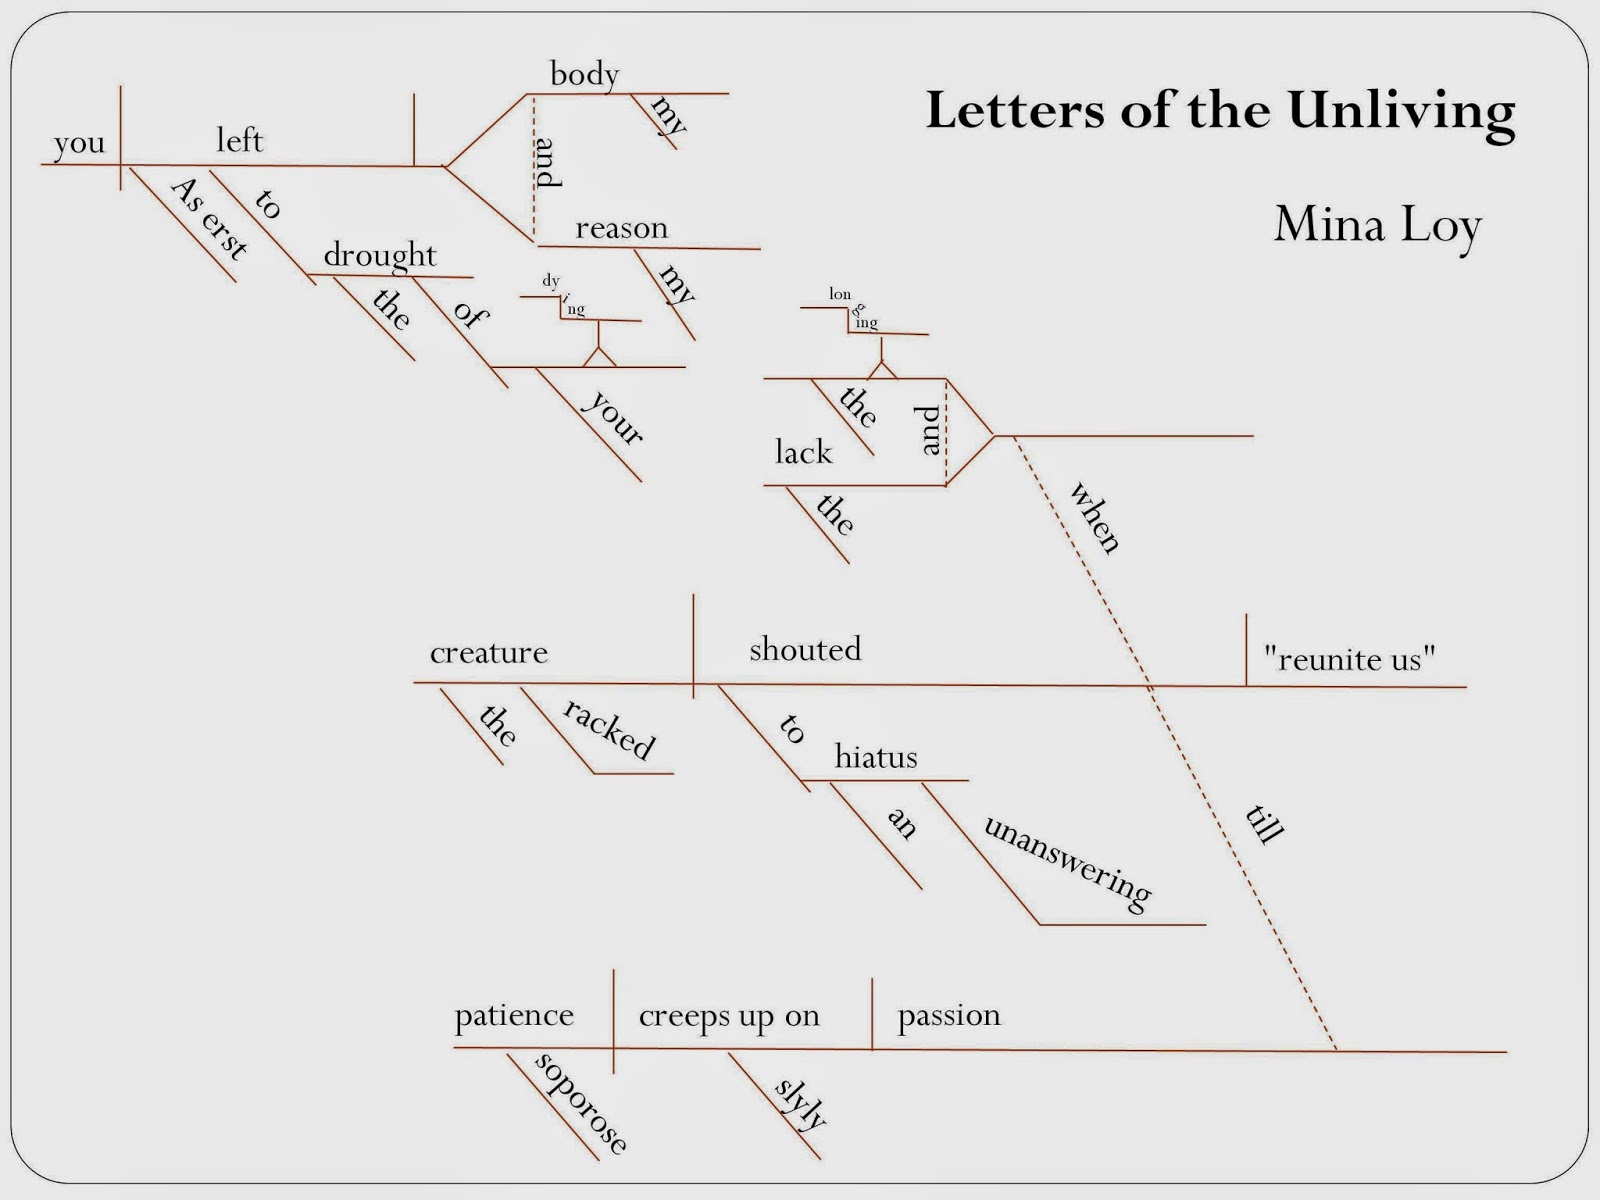
Diagramming Mina Loy's "Letters of the Unliving" as a Method for Close Reading

Diagramming Poetry as a Method for Close Reading
I have recently been working on a new collection of poetry that explores grief and loss.   In order to better study the poetry of loss, I've returned to the poet of my graduate thesis, Mina Loy.   I have found meaning in her poetry today that I could not find eight years ago. 


One of Loy's poems that quite literally makes me catch my breath is "Letters of the Unliving"  as published in The Lost Lunar Baedeker: Poems.


History and Syntax

Loy's history, thus the history of the poem is this: Loy met Arthur Cravan in 1917 and married him in 1918.  Opposed to serving in WWI, Cravan took Loy to Mexico to escape the military draft.  Once in Mexico, and after experiencing some trouble with both military authorities and the professional boxing crowd, "They bought a small, leaky sailing boat with the idea of patching it up and trading it in for a more seaworthy vessel"  so that Cravan might sail to Buenos Aires.  "In early November, only days before the Armistice was signed, Cravan set sail in the repaired craft for the nearby coastal village of Puerto Angel. The weather was fine and the boat apparently in good shape. Loy waited for days on the beach, gazing out to sea, but Cravan never returned" (Ford, 2007, para. 23).

However, no matter the interest in the tragic, romantic loss of love and self depicted this poem, the cathartic fear of loss we feel when we read the history, or perhaps because of the terrible beauty of the language of this poem, I have been having great difficulty sharing this poem with my students.  Although the idea, the elegy, makes the poem universal, the syntax makes the poem difficult to access.


Diagramming and Accessibility

Mina Loy
Image by Stephen Haweis, via Wikimedia Commons
In order to overcome the challenge of accessibility, I diagrammed a section of the poem to help my students better see and understand each unit of meaning, with all of its poetic license and grammatical truncation.  In its simplest form we can pick out subjects and predicates that, in and of themselves, are beautiful: "You left," she states.  "The racked creature shouted," she tells us, "'reunite us.'"  In the end, "Patience creeps up on passion."  The final diagram, though, is a mess, from a missing predicate in the second clause, to a phrasal verb in the final clause, to a fragmented quotation as part of an apostrophe in the third clause. Yet, no one said grief was grammatically pretty.  It's a tangle; a complicated tangle, and once my students and I saw it untangled for the first time, we shared a moment of understanding on one of its deepest levels.


The Gift of Excess

Of this poem and Loy, William Keckler beautifully and aptly states, "She creates a dignified superstructure in this dual elegy which allows for what might elsewhere be excessive; that is Loy's particular gift" (para. 3).  Once my students and I stripped excess from the poem, then put all of it back into place, we could all better understand this "dignified superstructure," this "dual elegy."  We could appreciate the language for what it gives us without leaving anything out.  Once we saw the poem for what it is we forgave what others might call "excess," and we embraced it, this looking back at grief from the future as a person forever changed by loss.


References


  • Ford, M. (1997). Spawn of Fantasies. New Republic, 216(21), 38-41.
  • Keckler, W. (2007). Mina Loy & Arthur Cravan: "Letters of the Unliving." [Web log, Joe Brainard's Pyjamas].  Retrieved June 4, 2014 from  http://joebrainardspyjamas.blogspot.com/2007/09/mina-loy-arthur-cravan-letters-of.html


Copyright Amy Lynn Hess.  Contact the author for permission to republish.

Using ChatGPT for Essays in English Composition Classes

The best essays are written by people for people. "Corona Typewriter" image courtesy of the author ChatGPT and other AI language g...